wordpress upgrade and other things

So, with the release of WordPress 2.2, I took the leap and updated tonight. It went really smooth and I seem to think there might be a performance gain, but it could be the vodka. You might have noticed that I am using the K2 theme, which has a slight issue with WP 2.2. You can get the fix here. It worked as advertised. If you are using WP-Cache you probably need to delete your root out of the cache to see the change.

Today, I was really glad I had my GPS unit, the Mio c310x. Twice today, I had to get somewhere fast and having the GPS let me bypass traffic and cut through other neighborhoods. It was cool saying, “hey, this is a load of crap… I’ll turn here…” and get me around the BS. Today in Atlanta, there was really heavy rain around the very beginning of rush hour and that set traffic home off to a terrible start. If only we had TMC like Europe has then is would trump Google! Maps on my Treo. I don’t think the c310x has the support for TMC, but that might be something to consider in my next GPS purchase.

BTW- I’ve done a considerable amount of stuff to my Mio over the last few weeks. Unfortunately, I don’t feel comfortable talking about them here. Let’s just say I am ready for a trip to Europe…

With regards to the Cheap-o HTPC, I’ve come to the conclusion and recommended to my brother-in-law, that an original XBOX is the way to go. For roughly under $100US you can find one on Craigslist, Ebay, or at a local pawn shop and easily hack it and put XBMC on it. He’s not a big game player, so he’s really only interested in the media capabilities. I’ve suggested a couple of places for him to find one and offered to hack it for him, so I’ll update as time goes on.

I also noticed that Trixbox 2.2 is out now. My Trixbox server is 2.1. I honestly don’t know if I’ll upgrade since it’s one of those things; if it ain’t broke… don’t fix it! If you read the thread over in the Trixbox forums, there is a way to upgrade despite what the first post says. We’ll see.

I’ve also been learning a lot about the business side of this. More on that, too.

Finally, I’ve been doing a lot of thinking about innovation and technology and how it affects my and my family’s life. I’ve started writing up a doc highlighting some of the key points, but I am not sure what I plan to do with it when I’m done. Maybe I’ll post it here… but I wouldn’t count on it.

using a heart rate monitor (HRM) successfully….

Man, I should be doing my real estate class or practicing my German, but since I was getting back to exercising after a couple month hiatus, I need to refresh myself and I can get on my soap box.

I’ve had three different HRM’s over the years and I think that each one has been an improvment over the other. The first one I got, I got from Aldi’s for $20. Hey, I figure that it was worth $20 bucks to try it. I was hooked. There was a little learning curve as I learned about the watch and my own body. I was able to see improvements and I minimized my injuries and colds I would get when I pushed myself too hard.

I lost the chest strap on the Aldi’s HRM, and I got a Polar A5. It was a step up but more designed for walkers. Still, I really enjoyed it. I liked being able to see how many calories I had burned on my workouts. My next watch I got on a good deal. I next got a Polar F6 and passed the A5 to my wife.

The F6 was even more impressive since you could upload your data to Polar’s website and track your goals, Lose Weight Exercises, etc. Pretty cool!

Now, using a HRM successfully depends on a strong beginning. The most confusing thing was trying to determine my base heart rate. The first two HRM’s said to simply take your age and subtract your age and multiply that times 60%, 70%, and 80% to get your zone. This is fine if you have never Lose Weight Exercised but this doesn’t take into account your level of fitness. I have been running for years and following this method I was barely breaking a sweat, It was apparent I needed a better way to determine my base HR. Now, you might want to know why the base HR is so important. Once you have your base then you can determine what zone you want to target:

Target Zones

60 – 70% of max HR Weight Loss, building endurance

70 – 80% of max HR Weight Management, improve cardio fitness

Like I said, the Age-Based formula is only good if you have been a couch potato for the last five years. If you have been doing anything… and I recommend this formula anyways, I recommend Karvonen formula. Basically, you take your heart rate in the morning as you are laying in bed for three mornings, average them together, use that number for the basic calculations and you can get dialed in to your personal fitness level.

More details can be found here:

It took me some trial and error to get it right, but I understand it now. In fact, I made a spreadsheet that I’ll share here for you to use to calculate your zones in both the traditional method and the Karvonen method. You can view the spreadsheet here:

Finally, I was suprised at how well the Polar OwnZone works. I have used it and was suprised at how close it was to the results I got from the Karvonen formula. While the OwnZone might be a no-brainer if your unit supports it, I think it is still important to know the logic behind it.

A HRM will let you maximize your Lose Weight Exercises and help you avoid getting hurt or getting sick. In the summer when I push myself on seven or eight mile runs, I would almost certainly get a little cold. A HRM and some L-Glutamine helped prevent that.

Finally, let me close with a story that I think will illustrate why I think a HRM is important for people starting out running or cycling. One day, when I was on a long run in the summer, I caught up to a guy who was walking but wearing running gear. I passed him on my steady pace only to be passed by him while he was running much faster than I. Then, about two minutes later, I passed him again while he was walking. Then he passed me again running fast. This went on another four times until finally we ended up at the same red light.

“I just started running!” he said. This novice runner didn’t have any concept of pace. He was heading down a path of injury or over excertion and didn’t know it. Typically, novice runners will go this route and get hurt or discouraged. A HRM takes the guesswork out and gives you a detailed view into how your body is doing regardless of your fitness level.

flexing the ol’ wordpress muscle

I don’t know very much about wordpress, but I know enough to be dangerous.  I’ve been wrestling with making my blog perform a little better and I haven’t really nailed it down yet.  I got a message from a friend today that my site was coming up blank and indeed it was.  If I was logged in as admin, everything looked fine, but if I wasn’t the site did come up blank.  I had a conflicting setting between wp-cache and another plugin trying to get get some additional performance.

If you search on the interwebs, you’ll find several people have their “Top 10 WP Plugins” and for the most part, everyone has their favorites.  But, there are a core group that everyone uses.  Once I nail down the performance issues and I am sure they are not related to the plugins, I’ll publish my list, too.

Today was a good day.  I broke my fishing pole a couple of weeks ago, (I’ve been taking the kids fishing at the lake in our ‘hood), and I got a really nice on on clearance at the Sports Authority.   It was $4!  You can’t beat that with a stick.  We also went to a neighborhood block party and had a nice time with all the neighbors.  It was a nice way to spend the Saturday.

If the weather holds up tomorrow, I’ll try to take the kids fishing again

let’s try this htpc one more time

I was able to upgrade some of the original PC’s componets with junk I had laying around. I got a motherboard/cpu in the case, (if you were following along, the motherboard I was using had a bad secondary IDE port), so I am re-installing Ubuntu 6.10 on it. After that’s done, I’ll upgrade it to the latest, (I’m too lazy to download and burn yet another ISO), and I seem to remember reading that MythTV is now a standard package with Ubuntu 7.04.

ubuntulogo.png

So, it’s installing now, then the updates and the application install. It will be a weekend project.

My wife’s best friend is coming in into town this weekend so I’ll have plenty of time to jam on this thing and play around with it. I also need to remove a sound card from my desktop. My desktop has on board audio, (pretty nice audio), and I installed Turtle Beach Santa Cruz card I bought for my last PC. I love that card! When I bought it, it was one of the more advanced pieces of hardware I had bought. But, I also use a USB headset and with three sound devices, WinXP sometimes gets confused and it upsets my wife.

Since it will be and just the kids, I am planning on taking them fishing in our lake. We’ve gotten pretty good at catching sunfish and my son got up enough courage to touch a nightcrawler. We’ll go see my Mom, go fishing, and maybe a Cinco De Mayo block party. Before we go, I’ll have to get some provisions.

I also received my 4GB SD card I got from last week’s Woot-off. I had to go out and buy a USB2.0 Card reader since I didn’t have any devices that use SD cards that could format the entire 4GB. Microcenter had a sale on a USB2.0 reader for $12 so I picked it up this afternoon; it works great. So, I shoud have more Mio stuff in the upcoming week.

foobarred POI’s on my Mio c310x

Man, I really messed it up. Hopefully, by reading this you’ll avoid the problems I had. First a little background. I am drinking wine from Aldi’s and have been messing with this darn GPS unit for some time. Wait, before you go further, you should be aware of my other posts regarding POI’s on the Mio c310x:

Now, I should point out that I just heard a song from Ian Brown and now Cat Power is playing. She’s awesome. (a little known fact amongst Comcast HSI users is that you get a free subscription to Rhapsody. If you ain’t using it, you deserve a punch in the stomach.)

So, back to my problems with the POI’s… I tried installing ALL of the Starbucks in the US and it caused me to exceed the available space I had on my unit (internal memory, not the SD card). The file was truncated and several of my POI’s had zeroed out coordinates. For awhile there, every time I tried exporting / importing the iGO database, I was getting errors from IGO POI Explorer. I was just about to do a hard reset when I had a thought..

Via ActiveSync, I renamed the existing iGO.db to iGO_old.db and I copied over a db from yesterday. I then restarted the unit and it saw the db just fine. When I started up iGO POI Explorer, it imported / exported the db just fine. I must of had some corrupt data in the existing db.

I added the various POI’s I wanted to and I tried something different:

  1. If you are using iGO POI Explorer (Beta) AND ActiveSync, I think this will make sure you have the latest file.
    1. File -> Export -> iGO Database to device (via ActiveSync)
    2. It should work.
    3. Restart MioMap (I realize now that it is NOT necessary to restart the whole device, rather just MioMap should be fine).

I was worried I would have to do a hard reset, but alas, all is well.

POI’s on the Mio c310x, part II

Just when you think you got it licked, someone builds a better mouse trap. Or at least another way to skin the cat. All snappy sayings aside, I came across this post over that the GPSPassion site:

In case you don’t feel like clicking over there, allow me to give you the reader’s digest version. OhMioMy came up with a way to quickly generate LAT and LONG from a .csv file, presumably from your contact database. Aside from that, it’s very similar to the directions I posted the other day:

He points out some different tools. I have to say, that I think it’s a good way to go about it, but I think I can simplify it even more.

A lot of this is from OhMioMy’s post so I am certainly not taking credit for his work but some of my steps are different.

First, check out this site, which uses Yahoo!’s GeoCoding API.

In step one, you can download an Excel template. Do that and you can see the format. Remember, that I was focusing on trying to help Realtors with the challenge of showing homes in an efficient manner. Here in Georgia, real estate professionas have access to either FMLS or Georgia MLS. Since I am a Realtor myself, I have access to FMLS. I checked and even though you can view available houses on a map, they don’t have any way to export addresses to a file. (If either MLS site would like my expert consulting advice on this, please let me know! lol) Therefore, I think the best you could do is to copy & paste the address info into this template found on batchgeocode.

So, let’s try this out and see if it will work as well as I think it would. In my previous post, I suggested you put your addresses in Google Earth. How about just putting your addresses in the Excel template. You can download the info I put in the sheet for this example here:

  • Excel Example Atlanta

So here’s what I did. I had the Excel file opened, selected my info and copy and pasted into the page on http://www.batchgeocode.com/. I did step three which is to validate my data, and it found what it was supposed to, (since it was “tab” delimited). I ran step 5, and the Geocoding magic happened and it looks good. I see my LAT and LONG fields. The map the site generated looks pretty good, too.
<br /> Sorry. If you’re seeing this, your browser doesn’t support IFRAMEs.<br /> You should upgrade to a more current browser.<br /> Notice that you can save or export the file into a Google Earth kml file; do it! I picked “Save to Disk” so it wouldn’t open up Google Earth. Now, connect your unlocked Mio to your PC and let ActiveSync do it’s thing. At this point, you should now have IGO POI Explorer open. Then Import the “Google Earth KML file (*.kml; *.xml).” In my case, it downloaded to my default folder and was called “BatchGeocode.kml” so make sure you find it. No problem, POI Explorer imported it and it looks fine. The comments field are a little wonky, but I can live with that.Note; I had some problems when I fired up iGO POI explorer before ActiveSync. I was able to “restore” the database and finally import my POI’s… YMMV!
You should see something like the following:

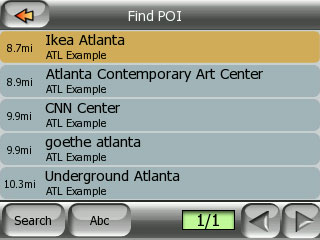
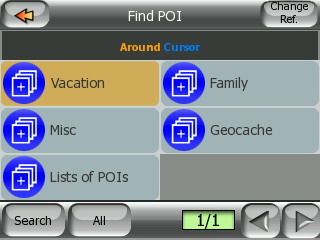
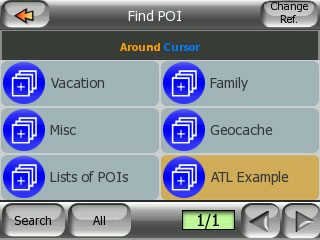
At this point I’d rename “BatchGeocode” to something that makes sense. Sticking with the theme, I’ll pick “ATL Example.” Then, drag & drop into the “iGO POI Database” top level. At this point, I’d restart the c310x twice just to make sure the iGO.db syncs up. Keep the POI explorer open. Sure enough the POI’s were imported and now on my Mio:


POI import

POI import 2

So, I think this works well, and is perhaps easier and more light Lose Weight Exercise than using Google Earth. I hope this helps and comments are welcomed.

POI’s on my mio c310x

Update 240407: Be sure to check out some updated instructions in this earlier post: POI’s on the Mio c310x, part II! Both ways work, it’s up to you!

My sister-in-law recently bought a Mio c310x from Frys.com; they have them for $189 free shipping, (until supplies last). It’s different enough from her old(er) Garmin, there is a steep learning curve. I guess if you get used to one UI, then it might make it more challenging to learn a new one. I was over at her house tonight trying to show her how to input POI’s, Points of Interest, into her Mio via the PC. It was a little challenging since I began to forget how I set it up and by the time I got it going we had to leave. So I promised her I would write something up. This should help you get up and running for adding your POI’s quickly and painlessly. First, you need some things before you begin:

(Leah, if you are reading this, you are already past this point. You got everything you need!)

By the way, I should mention that as Realtors, I am keeping that sort of functionality in mind. The overall goal is to make a list of properties or addresses and visit each one in the most efficient manner. Oh, and this is all Windows based. So far, I haven’t seen any way to do this on a Mac.

I’m not going to get into the how-to’s to install ActiveSync or the rest of the software. Here’s what you need to do once you get all the mentioned software installed.

  1. If you haven’t already created and save a POI on the c310x itself. You need to do so. the iGo software looks for a specific database file that doesn’t exist until you do. Simply go into the “Map View” or similar (depends on what skin you are using), and find an address. If you are in the Map view, you should automatically get the bottom menu that pops up and says, “Save POI.” If you save it, you will have your iGo.db file that we need to have initially on your device.
  2. Fire up Google Earth. Select “My Places” and select “Add” and choose “Folder.” Name the folder something useful. In my example, I named my folder “List of POIs.” Next, in “Search” box, make sure the “Fly To” tab is selected. Enter your address here.
  3. As Google Earth zooms in, you should see your address in the lower pane in the “Search” box. You can click and drag that entry into the folder you made in step 2. Repeat for the other addresses you want.

  4. Next, you need to export the folder to a file you can read into the iGo POI Explorer.
    1. Right click on your folder from Step 2 above.
    2. Choose “Save As” and pick a place and a name where you can find it and remember what it was called.
    3. You are done with Google Earth… for now. Close it up.
  5. Next, connect your Mio and have it connect with ActiveSync. I would suggest have it connected for the next steps.
  6. Fire up the iGo POI explorer program. If you haven’t gotten it setup yet, go to Tools -> Options and make it look like the following:

  7. Next, import the file you made in Step 4.
    1. In iGo POI Explorer choose File -> Import -> POI’s from File. In the “Files of Types” menu from the Import window, choose “Google Earth KMZ file (*.kmz)”:

    2. The folder now should appear outside the “iGO POI Database.” Drap it into the top level “iGO POI Database so it appears with your other POI’s. After you do this, it should show up in the main tree and all of your addresses you entered are shown as coordinates. Pretty slick if you ask me:

  8. Now, I found I need to restart my Mio twice. How you restart it twice is up to you, but I don’t see the changes unless I do. So, after the second restart, fire up Mio Map. Choose your favorite method of looking at the Map or Cockpit and check out your POI’s:

    display_6.jpg

    display_7.jpg

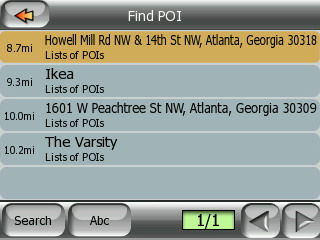
  9. Notice how the address are ranking from closest to furthest. At this point you can just choose to “route to” the next closest POI. You can set up a “route” if you want. But this should get you going.

Perhaps in my next post, I’ll continue about setting up a route with the various POI’s. I hope you found this helpful.

update on the ol’ htpc

Well, it’s been a while since I’ve written anything about my efforts to build a cheap-o HTPC on an old Pentium 450.  Frankly, I haven’t had much time to deal with it.  Where I last left it, I took it over to my bro-in-law’s house and we tried to get it going since we wanted to watch some German Soccer.  It didn’t work since we needed some sort of VGA -> TV converter.  We ran out trying to find one in the area under the radar of the spouses and we didn’t have any luck.  I brought it home with the intent of working on it more and it’s just been sitting around.

I will say that we used a pair of the Netgear ethernet-over-powerline and I was impressed how well they worked.

Some questions have come up over how secure these things are, but they worked out of the box as advertised.  I keep meaning to look into the security thing more closely.

I’m also planning on writing about importing POI’s  on the Mio c310x.  I was helping my sister-in-law with her Mio and realized that it is pretty complicated on setting up so I promised I’d write something up.  I’ve already started the draft and should have something up in the next few days.

Keep checking back, Space-fans!

zyxel G-570S

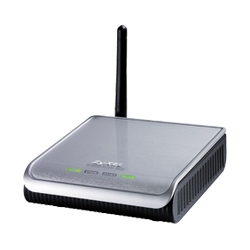
I got a chance to evaluate a Zyxel G-570S Access Point. I guess I should say that I am still evaluating it. I usually doing something on my G4 Powerbook when putting our son to bed. I’ve been frustrated since I appear to sit in a dead spot and my wireless connection crawls along. Now, I am running an older WRT54G with dd-wrt on it. I love the firmware and the community around it so I’m an going to continue to use it. I thought it would be great if I could extend my wireless network in my house to cover the area where I sit when I put my son to bed. When I was using a NetGear router, I actually made a parabolic reflector out of cardboard and aluminum flashing tape to direct my signal to the second floor of our house; it worked as there was an increase in signal strength! But the reflector I made fit nicely on the Netgear but comes no where close on the WRT54G.

The G-570S looks sharp. I like the look and size of it. It is easy to set up as an AP or even as a bridge, but trying to grok the AP+Wireless Client seems a bit beyond the normal manual. The manual isn’t clear on this, but if you select the AP+Wireless Client option, it looks like it wants the MAC addresses for WDS. From what I understand about WDS, the wireless stations will only talk to each other; not accept any connections from clients. Here, the manual leaves a little to be desired. Of course, the manual seems to suggest that if you used only the G-570S in your wireless network, this would automagically work all seemlessly.

Here’s my beef. My wireless network is using WPK and both stations support that. But if I try using AP+Wireless client in the 570S, it only lets me choose between WEP and Disabled. It appears that a newer firmware released in March will let me select WPK for the wireless security, but I haven’t had much luck getting it installed.

As far as using this thing as a pure access point, it’s great; works well and the signal is strong. The menus are some of the easiest I have seen which means my parents could figure it out. I think it’s a nice device. I’m going to muck around with it and see what else I can do with it.

ZyXEL G-570S

geocaching and the mio c310x

I said in an earlier post I would write about what I thought was the sweet spot for using the c310x for Geocaching. I can’t believe how much faster and accurate it is than my older eTrex. Around my office I have several geocaches I can walk to in a matter of minutes. I now realize that you can optimize your settings and have a pretty good success rate.

You should know this screen well:

First, I recommend you put your mio into “pedestrian” mode.

Notice that when you select Pedestrian, everything that you’d need in a car is disabled. This is under the Route Options from the main settings menu.

Next, check out your advanced settings:

Pick Route Options. This threw me big time when I first tried to Geocache with this unit. Uncheck “Keep Position on Road.”

This will show your real position. Now, I have been Geocaching in downtown Atlanta, so this has worked well for me.

EDIT 090407: I remembered that the Advanced menu you see “out of the box” is NOT the same as I posted above. I had forgotten that I had installed “MoonBear’s” skin to get a faster fly-over. However, the “Keep Position on Road” option should be on the main advanced menu on a unhacked c310x. His skin is number 8 on the folllowing page:

Since I took these screenshots, I’ve skinned my Mio so my menus now look really different. Good luck!