POI’s on the Mio c310x, part II

Just when you think you got it licked, someone builds a better mouse trap. Or at least another way to skin the cat. All snappy sayings aside, I came across this post over that the GPSPassion site:

In case you don’t feel like clicking over there, allow me to give you the reader’s digest version. OhMioMy came up with a way to quickly generate LAT and LONG from a .csv file, presumably from your contact database. Aside from that, it’s very similar to the directions I posted the other day:

He points out some different tools. I have to say, that I think it’s a good way to go about it, but I think I can simplify it even more.

A lot of this is from OhMioMy’s post so I am certainly not taking credit for his work but some of my steps are different.

First, check out this site, which uses Yahoo!’s GeoCoding API.

In step one, you can download an Excel template. Do that and you can see the format. Remember, that I was focusing on trying to help Realtors with the challenge of showing homes in an efficient manner. Here in Georgia, real estate professionas have access to either FMLS or Georgia MLS. Since I am a Realtor myself, I have access to FMLS. I checked and even though you can view available houses on a map, they don’t have any way to export addresses to a file. (If either MLS site would like my expert consulting advice on this, please let me know! lol) Therefore, I think the best you could do is to copy & paste the address info into this template found on batchgeocode.

So, let’s try this out and see if it will work as well as I think it would. In my previous post, I suggested you put your addresses in Google Earth. How about just putting your addresses in the Excel template. You can download the info I put in the sheet for this example here:

  • Excel Example Atlanta

So here’s what I did. I had the Excel file opened, selected my info and copy and pasted into the page on http://www.batchgeocode.com/. I did step three which is to validate my data, and it found what it was supposed to, (since it was “tab” delimited). I ran step 5, and the Geocoding magic happened and it looks good. I see my LAT and LONG fields. The map the site generated looks pretty good, too.
<br /> Sorry. If you’re seeing this, your browser doesn’t support IFRAMEs.<br /> You should upgrade to a more current browser.<br /> Notice that you can save or export the file into a Google Earth kml file; do it! I picked “Save to Disk” so it wouldn’t open up Google Earth. Now, connect your unlocked Mio to your PC and let ActiveSync do it’s thing. At this point, you should now have IGO POI Explorer open. Then Import the “Google Earth KML file (*.kml; *.xml).” In my case, it downloaded to my default folder and was called “BatchGeocode.kml” so make sure you find it. No problem, POI Explorer imported it and it looks fine. The comments field are a little wonky, but I can live with that.Note; I had some problems when I fired up iGO POI explorer before ActiveSync. I was able to “restore” the database and finally import my POI’s… YMMV!
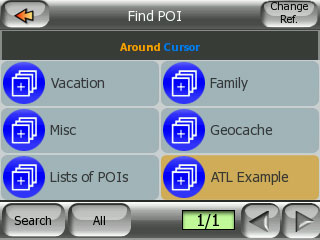
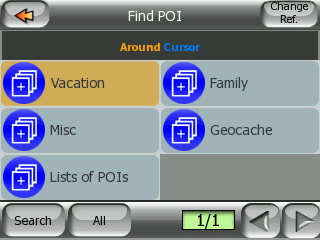
You should see something like the following:

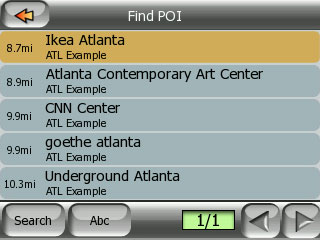
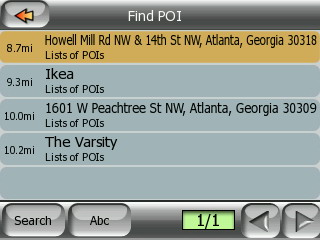
At this point I’d rename “BatchGeocode” to something that makes sense. Sticking with the theme, I’ll pick “ATL Example.” Then, drag & drop into the “iGO POI Database” top level. At this point, I’d restart the c310x twice just to make sure the iGO.db syncs up. Keep the POI explorer open. Sure enough the POI’s were imported and now on my Mio:


POI import

POI import 2

So, I think this works well, and is perhaps easier and more light Lose Weight Exercise than using Google Earth. I hope this helps and comments are welcomed.

POI’s on my mio c310x

Update 240407: Be sure to check out some updated instructions in this earlier post: POI’s on the Mio c310x, part II! Both ways work, it’s up to you!

My sister-in-law recently bought a Mio c310x from Frys.com; they have them for $189 free shipping, (until supplies last). It’s different enough from her old(er) Garmin, there is a steep learning curve. I guess if you get used to one UI, then it might make it more challenging to learn a new one. I was over at her house tonight trying to show her how to input POI’s, Points of Interest, into her Mio via the PC. It was a little challenging since I began to forget how I set it up and by the time I got it going we had to leave. So I promised her I would write something up. This should help you get up and running for adding your POI’s quickly and painlessly. First, you need some things before you begin:

(Leah, if you are reading this, you are already past this point. You got everything you need!)

By the way, I should mention that as Realtors, I am keeping that sort of functionality in mind. The overall goal is to make a list of properties or addresses and visit each one in the most efficient manner. Oh, and this is all Windows based. So far, I haven’t seen any way to do this on a Mac.

I’m not going to get into the how-to’s to install ActiveSync or the rest of the software. Here’s what you need to do once you get all the mentioned software installed.

  1. If you haven’t already created and save a POI on the c310x itself. You need to do so. the iGo software looks for a specific database file that doesn’t exist until you do. Simply go into the “Map View” or similar (depends on what skin you are using), and find an address. If you are in the Map view, you should automatically get the bottom menu that pops up and says, “Save POI.” If you save it, you will have your iGo.db file that we need to have initially on your device.
  2. Fire up Google Earth. Select “My Places” and select “Add” and choose “Folder.” Name the folder something useful. In my example, I named my folder “List of POIs.” Next, in “Search” box, make sure the “Fly To” tab is selected. Enter your address here.
  3. As Google Earth zooms in, you should see your address in the lower pane in the “Search” box. You can click and drag that entry into the folder you made in step 2. Repeat for the other addresses you want.

  4. Next, you need to export the folder to a file you can read into the iGo POI Explorer.
    1. Right click on your folder from Step 2 above.
    2. Choose “Save As” and pick a place and a name where you can find it and remember what it was called.
    3. You are done with Google Earth… for now. Close it up.
  5. Next, connect your Mio and have it connect with ActiveSync. I would suggest have it connected for the next steps.
  6. Fire up the iGo POI explorer program. If you haven’t gotten it setup yet, go to Tools -> Options and make it look like the following:

  7. Next, import the file you made in Step 4.
    1. In iGo POI Explorer choose File -> Import -> POI’s from File. In the “Files of Types” menu from the Import window, choose “Google Earth KMZ file (*.kmz)”:

    2. The folder now should appear outside the “iGO POI Database.” Drap it into the top level “iGO POI Database so it appears with your other POI’s. After you do this, it should show up in the main tree and all of your addresses you entered are shown as coordinates. Pretty slick if you ask me:

  8. Now, I found I need to restart my Mio twice. How you restart it twice is up to you, but I don’t see the changes unless I do. So, after the second restart, fire up Mio Map. Choose your favorite method of looking at the Map or Cockpit and check out your POI’s:

    display_6.jpg

    display_7.jpg

  9. Notice how the address are ranking from closest to furthest. At this point you can just choose to “route to” the next closest POI. You can set up a “route” if you want. But this should get you going.

Perhaps in my next post, I’ll continue about setting up a route with the various POI’s. I hope you found this helpful.

The maps, man. it’s all about the maps

Okay, I’ve been reading up on this, so I think it will work. As you might have read, we went on a Florida vacation to Orlando. We are in Atlanta and drove our Eurovan down. I am also using my new Mio c310x and trying to put it through its paces. Yes, the maps are two years old, but come on… roads don’t change that often. Actually, the condo we rented was in a new neighborhood so it wasn’t on any maps, even Mapquest. However, Google! Earth did have an image of it. So I created two POI’s; one for the house itself and the intersection that was on the map. It worked well.

On the way down, we met up with my brother-in-law who we were sharing the rental with. So our caravan of, well.. vans, continued on down to Orlando. Traffic was really bad in Georgia due to the construction. It appeared they were repairing bridges but it took much longer than it should since it was stop and go for most of the ride in Georgia and traffic only reached the speed limit for a few minutes at a time. At one point, we put our faith in the GPS and took it off the highway. It was a nice diversion and we saw some of the small towns that are famous in Georgia. We got back on the highway near the Florida border and started making up for lost time.


Then, we saw some thick, black smoke up a ahead. The road was closed and we were about 3/4 of a mile from the actual closure. We could see firetrucks and other emergency vehicles. At one point, a flat-bed tow truck with sirens came racing up the side of the road with a back-hoe on it. The smoke died down and we were ready to get moving again. Then, more smoke on the other side of the road. The fire had jumped the highway somehow. We were parked on the highway for about 1.5 hours and everyone was walking around and talking. It was actually really nice. The weather was perfect in the mid 60’s and there was a pretty good breeze blowing. Plus, a fire always smells nice when there is just a little nip in the air. Someone said that they heard from their Mom that it was brush fire and an accident (unrelated apparently) that caused the road closure. Looking back, I wish I took more pictures since it was pretty cool. My brother-in-law took video.

In the second picture, you can see the blackened area that was burned. We drove by and could feel the heat from the fire. This was about one mile from the end of the Florida Turnpike; they waved us through and did not collect any toll. When all said and done, what should have been a seven hour trip took just a hair under 13.

The trip was great and we all had a wonderful time. We all enjoyed Disney and had a nice time puttering around the Orlando area.

While we were down there, I got the bright idea to start recording our tracks doing various things. This is the return trip from Orlando. Don’t worry, I edited the ending point so you couldn’t figure out where I live if you didn’t already know.

<br /> Sorry. If you’re seeing this, your browser doesn’t support IFRAMEs.<br /> You should upgrade to a more current browser.<br />

If this works, you should see Google! Map of our return trip above. I have a couple of other maps to add but it is late and I’ll just update this post probably tomorrow.

<br /> Sorry. If you’re seeing this, your browser doesn’t support IFRAMEs.<br /> You should upgrade to a more current browser.<br />

The above map is the very beginning and about the last 1/4 of our day there. We spent around 13 hours there and just the recorded tracks covered 6.5 miles. That’s a lot of walking. We estimate that we all walked over twelve miles over the course of the day with waiting in lines and what not. I think the line is broken up since I specified 300 data points in the route. By default, the Mio updates the route every one second and I think maybe for walking, it might make sense to change that to a higher number.

<br /> Sorry. If you’re seeing this, your browser doesn’t support IFRAMEs.<br /> You should upgrade to a more current browser.<br />

The above route is when we went to a place called the Mercado, which is now about to be demolished. It was a great place. In fact, it was one of the only places that I felt like no one was trying to get into my wallet. If you look at the northern end of the track, you can see where we went in and looked around only to find a ghost town. It was sad. This place was great. In the middle you can see where we played miniature golf. And near the bottom you can see where we had dinner and I walked around with the twins outside while the rest of the folks finished their meals. Again, the track must be broken up since the settings hit the 300 data point limit.

I really wanted to post these maps as a proof of concept. I think it worked okay. WordPress seems to have some indigestion around the iframes but that is something to tackle on another day.

my mio c310x

I finally got a Mio c310x. Surely you’ve already heard about how hackable this GPS unit is and all the super slick things you can do with it. And hacking it was really easy.

I’ve had a hand-help GPS unit for a while now. I have a Garmin eTrex Venture. It’s okay and I sure used it a lot for Geocaching, but I’ve been really dying for a auto-based GPS unit. I had to travel to Dallas with a few people from work and a friend brought his Mio c310x he got on Black Friday 2006 for ~$150. I was so impressed with it. My sister-in-law had a Magellen c320 (I think) and I played with that a little when she first got it, but I liked the Mio and its internal, rechargeable battery.

Shortly after that, I heard Clark Howard talk about how useful a mobile auto-based GPS unit was and how cheaply they could be found for. He made a lot of sense! Taken from his website:

GPS units are cheap and easy to use

Do you remember when GPS units were something only the very wealthy could afford? A built-in unit was about $2,000 and a portable unit was about $800. Times have changed quite a bit. Clark recently bought a portable unit for less than $300 and it’s possible to find them for under $200. The more expensive units will tend to have the hard drive built-in to the unit, while the less expensive ones have an SD chip. And there are good and bad factors to both. But they are so simple to use and they have a memory of all of your addresses. These are hot gifts this holiday, so think about one for your loved one. Or wait even longer and they are sure to go down even more.

My wife finally gave me the go ahead to get it after I sold some old Directv receivers, so I went to Fry’s with the kids and picked one up. Of course they tried to sell me the 3-year extended warranty. When I stopped laughing I told them I wasn’t interested. I paid for it and got the kids in their seats and opened it up. It had a 75% charge out of the box and I used it to navigate me home.

I breifly took a look at the manual, but I’m a touchy-feely sort of guy so I’ve been playing with it six ways to Sunday. It isn’t perfect and now that I’ve played with it for some time, I am very happy with it. I don’t know if any other > $200 GPS units come close but I am very happy with it.

Out of the box, you can play MP3’s with it. Hoo-hum. The software that came with it reminds me of the old Sony software they had for mini-disks; not very useful. But there are hacks out there you can really have a lot of fun with.

The best way to move files back and forth is with Microsoft’s ActiveSync which is for PDA’s running Windows CE. This works flawlessly. Couple this with an external card reader, (the Mio is usb 1.1), and you can be rocking and rolling in no time.

One of the negatives you’ll hear about the Mio is that the maps are just over two years old. Still, I haven’t had any problems yet getting around Atlanta and North Georgia. The maps have been good without any real big noticeable problems.

I put the included suction-cup mount in our van and use the Mio on my lap or the passenger seat when I am in the other car. It picks up the GPS signals really good. I can even get a lock inside the house. I don’t quite understand it, but I like it. It makes it easy for planning routes beforehand.

An SD card is key for having any fun with this unit. You can put the unlocking script on the SD card and you can backup and export your track logs. I am able to import my track logs into Google Earth. That’s pretty cool if you ask me. I’ve always liked so see where I went overlayed on the Google! maps.

Once you hack your Mio c310x you can do any of the following:

  • Play movies
  • Add voices
  • Edit and plan POI’s on your PC
  • Play games
  • Install TomTom or other nav software
    • The general opinion is that MioMap is better than TomTom
  • Use ActiveSync
  • Access the Windows CE environment
  • Change skins

It is just a fun thing to tinker around with. My sister-in-law just ordered one from Frys.com for $189 plus tax (free shipping). I’ll help her get it all set up.

One of the coolest things that I like is that iG0 released a beta application that will allow you to edit/import/export/sync via ActiveSync POI’s (points-of-interest). My sister-in-law and I are both Realtors so this will be very handy when showing properties.

Here’s a list of the links I have used to make it this far:

I forgot one very important link: